


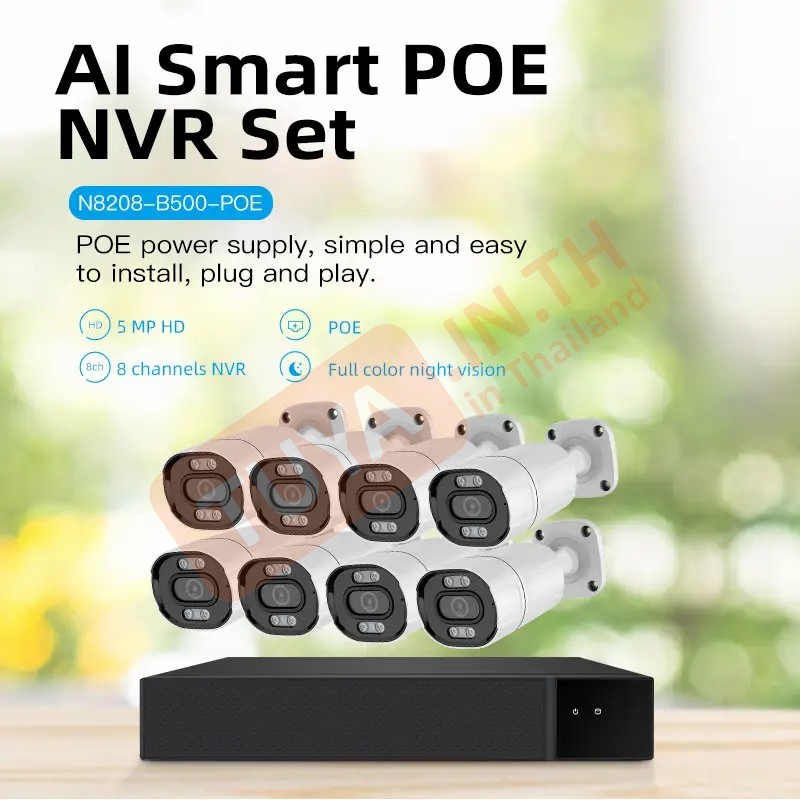
CMRK-PA08 ชุดกล้องวงจรปิดแบบมีสาย 8 ตัว POE พร้อม NVR สีดำ 3MP H.265 1080P DC12V
รายละเอียดสินค้า
CMRK-PA08 ชุดกล้องวงจรปิดแบบมีสาย 8 ตัว POE พร้อม NVR สีดำ 3MP H.265 1080P DC12V
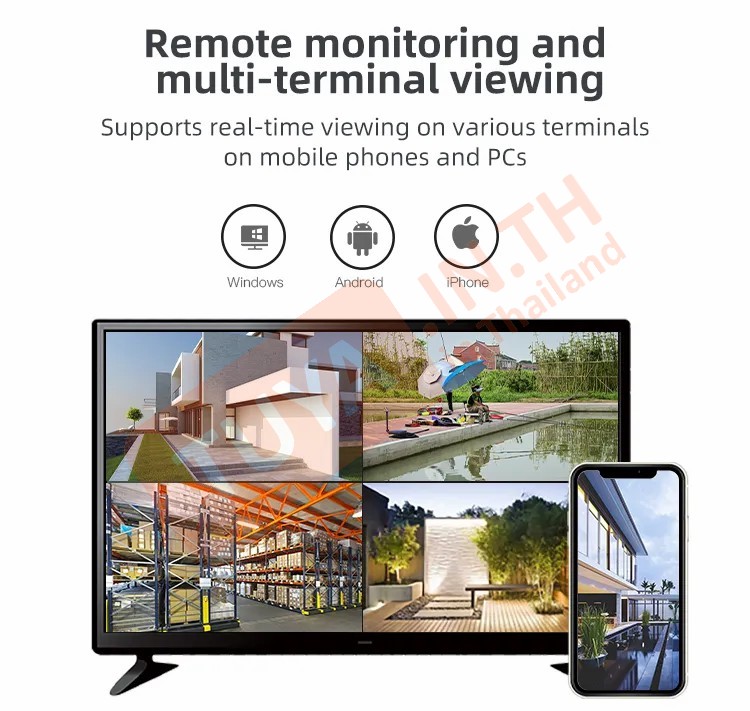
คู่มือวีดีโอแนะนำการใช้งาน : https://www.youtube.com/watch?v=n6y3IcKKOIY
|
|
||
|
Kits | Brand Name |
TUYA |
|
Model Number | CMRK-PA08 | |
|
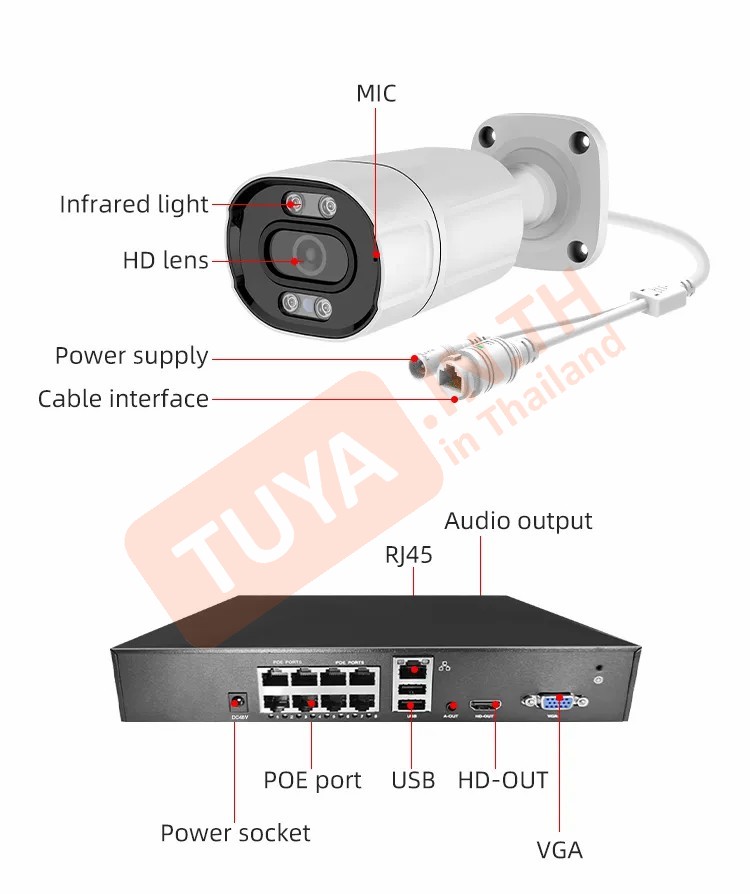
POE Camera |
Lens |
3.6mm |
|
Sensor |
1/2.5"SC335E CMOS |
|
|
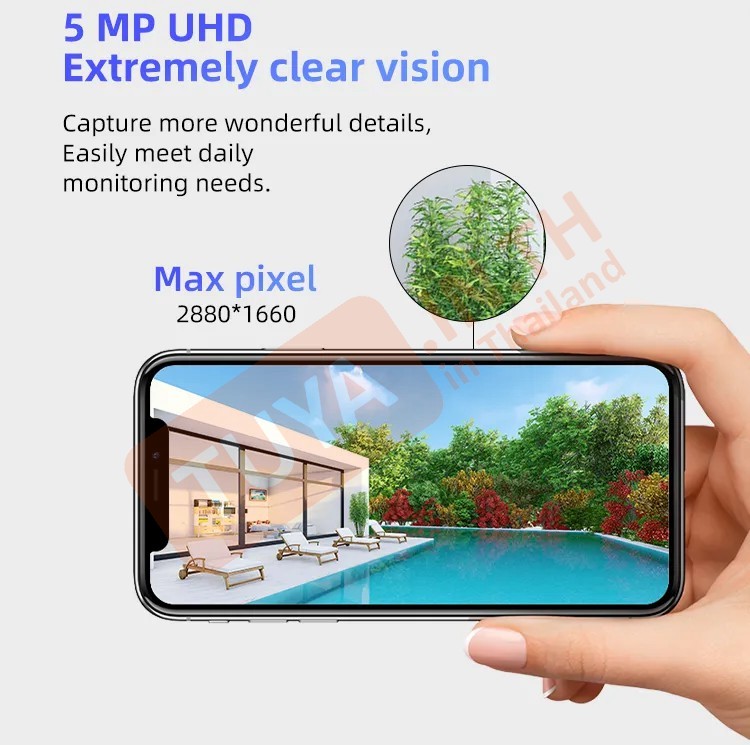
Image Pixel/Resolution |
3MP |
|
|
Image Compression: |
H.265 |
|
|
Infrared Distance |
To 30m |
|
|
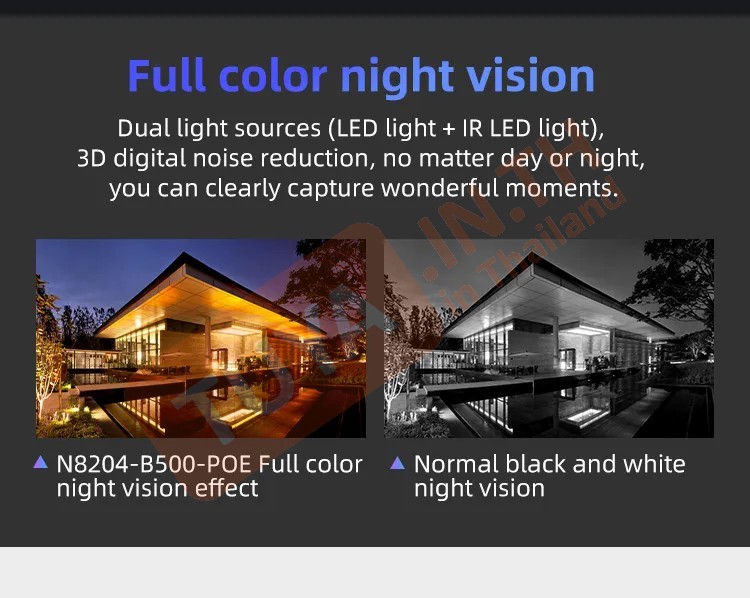
Day & Night |
Automatic IR-Cut |
|
|
2D/3D DNR |
Auto/BW/Color |
|
|
OSD |
Date Time/Tilt |
|
|
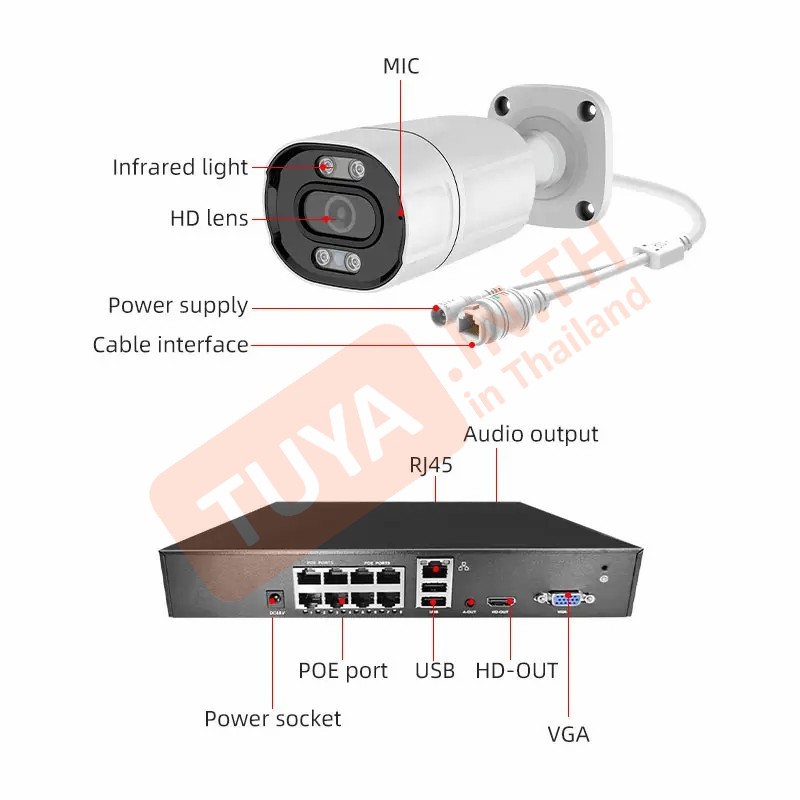
Internet Interface |
1*RJ45 Ethernet Interface, 802.11b/g/n |
|
|
Power |
12V DC/2A (Output), 100-240V AC (Input) , 50-60HZ |
|
|
Shape material |
Plastic |
|
|
Waterproof |
|
|
|
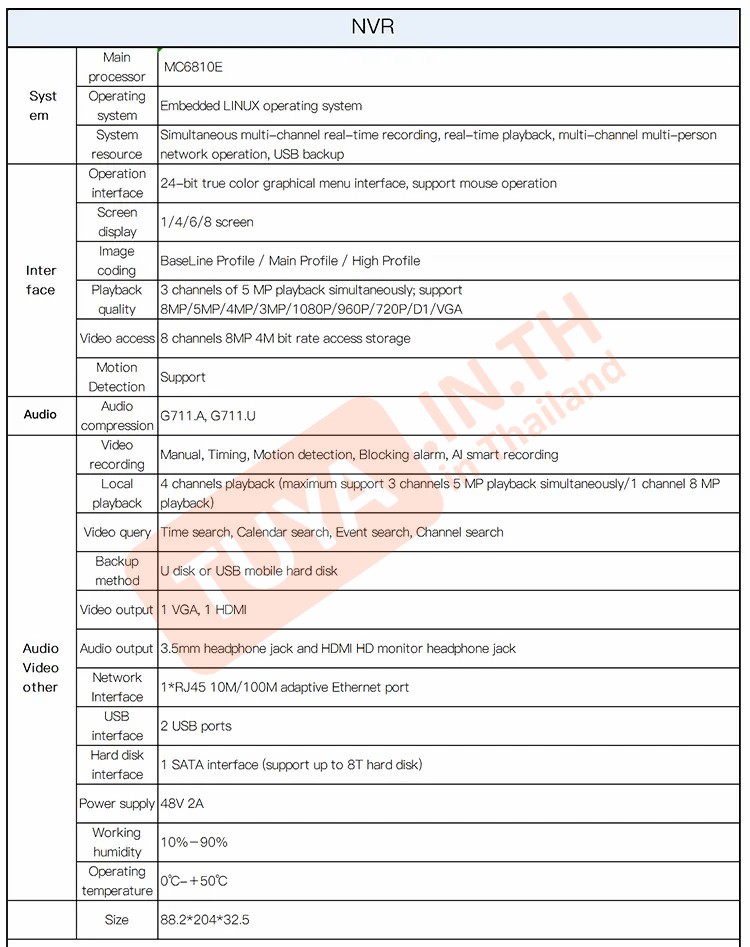
POE NVR |
Model No |
|
|
Audio interface |
|
|
|
support audio and video synchronization |
||
|
Video Output |
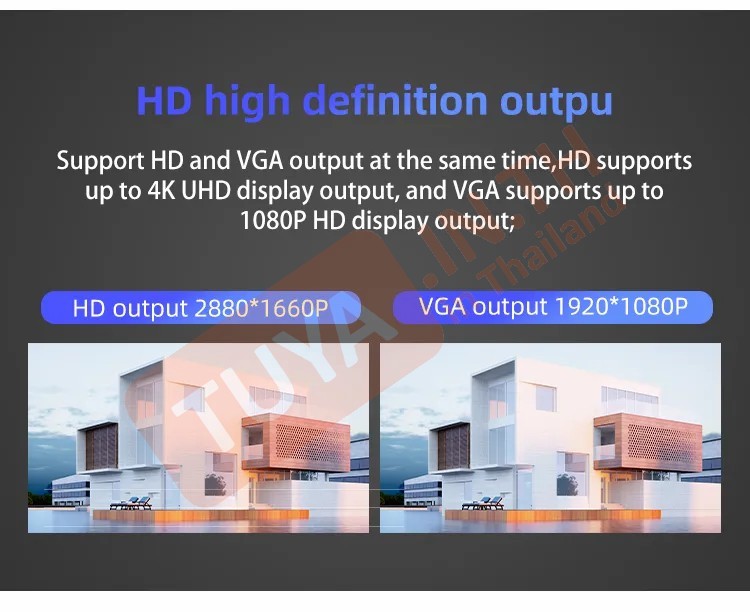
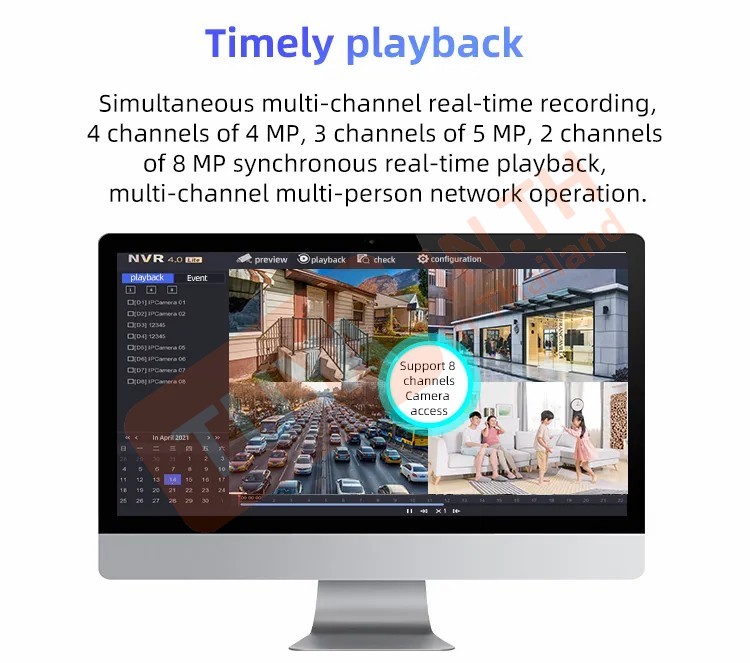
Main Stream:5MP 2592*1944@15fps;4MP 2560*1440@20fps; |
|
|
2MP 1920*1080@20fps;Sub Stream:704*576@25fps |
||
|
Record mode |
Manual,Alarm,Motion Detection,Timing |
|
|
Internet Interface |
5*RJ45 10M/100M, 4*RJ45 support POE IEEE802.3af/at |
|
|
Backup method |
USB, Mobile hard disk,network backup,SATA |
|
|
Network protocol |
On-vif/P2P/RTSP/FTP/DHCP/NTP/UPnP |
|
|
Power |
48V/2A |
|
|
Size |
L218*255*41mm |
|
|
Characteristics |
AI |
motion detection |
|
D-WDR |
Support |
|
|
WEB |
Support |
|
|
CMS |
Support |
|
|
Operation interface |
16-bit true color graphic menu operator interface
with mouse operation |
|
|
Video Access |
4 channels 5M/8 channels 5M/4 channels 1080P |
|
|
Motion Detection |
Support |
|
|
Storage Type |
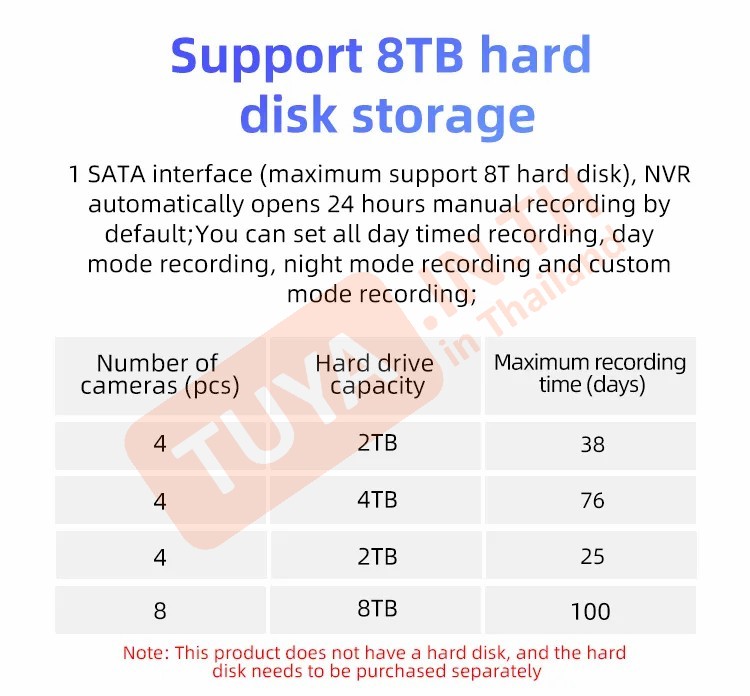
1 * SATA Interface(Max 8TB) |
|
|
OEM & ODM |
Support |
|
|
Custom LOGO |
Support |
|
|
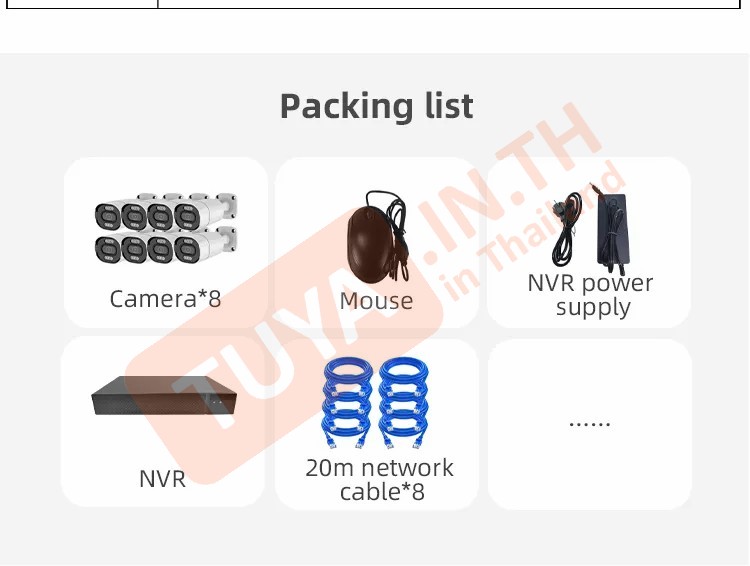
Kit Including |
Packing info |
*1 x 4CH 5MP 48V POE NVR |
|
*4/8 x 5MP POE Dome Cameras |
||
|
*4/8 x 20M Power Network Cable for Camera |
||
|
*1 x Power Supply for NVR |
||
|
*1 x Mouse for NVR |
||
|
*1 x User manual |
||
|
*4/8 x Waterproof Connector for Cable |
||
|
|
||


รองรับการเชื่อมต่อกับ


| ฟังก์ชั่นในหน้าหลัก (MAIN PAGE FUNCTION) | |
|---|---|
| Sound | On / Off |
| Screenshort | |
| Recording | |
| Recording video | |
| Zoom in / Zoom out | |
| Cloud storage | |
| Direction | |
| ฟังก์ชั่นการตั้งค่าในส่วน SETTINGS | ||
|---|---|---|
| Third Party Supported | Amazon echo | |
| Google home | ||
| Basic Function Settings | Time Watermark | On / Off |
| Talk mode | One-Way Communicaion | |
| Two-Way Talk | ||
| Detection Alarm Settings | Motion Detection Alarm | On / Off |
| Alarm Timer Settings | Schedule | Add |
IF THEN ของกล่องควบคุม
| IF | THEN | ||||
|---|---|---|---|---|---|
| Format Status | -20000 - 20000 | ✕ | Format Status | -20000 - 20000 | ✕ |
| Current Storage Device | 0-65535 | ✕ | Current Storage Device | 0-65535 | ✕ |
| Siren | Siren on / off | ✓ | Siren | Siren on / off | ✓ |
| Restart Device | On / Off | ✕ | Restart Device | On / Off | ✕ |
| Supported Storage | 0-65535 | ??? | Supported Storage | 0-65535 | ??? |
| Storage Device Status | 1-5 | ✕ | Storage Device Status | 1-5 | ✕ |
| Format Storage Device | On / Off | ✕ | Format Storage Device | On / Off | ✕ |
IF THEN ของตัวกล้อง
| IF | THEN | ||||
|---|---|---|---|---|---|
| Motion Alert | On / Off | ✓ | Motion Alert | On / Off | ✓ |
| Stop Zoom | On / Off | ✕ | Stop Zoom | On / Off | ✕ |
| Zoom control | Zoom out / Zoom in | ✕ | Zoom control | Zoom out / Zoom in | ✕ |
| Motion detection | 1 | ✕ | |||
| Humanoid detection | 1 | ✕ | |||
Sound : ไม่มีเสียงแจ้งเตือนเชื่อมต่ออุปกรณ์
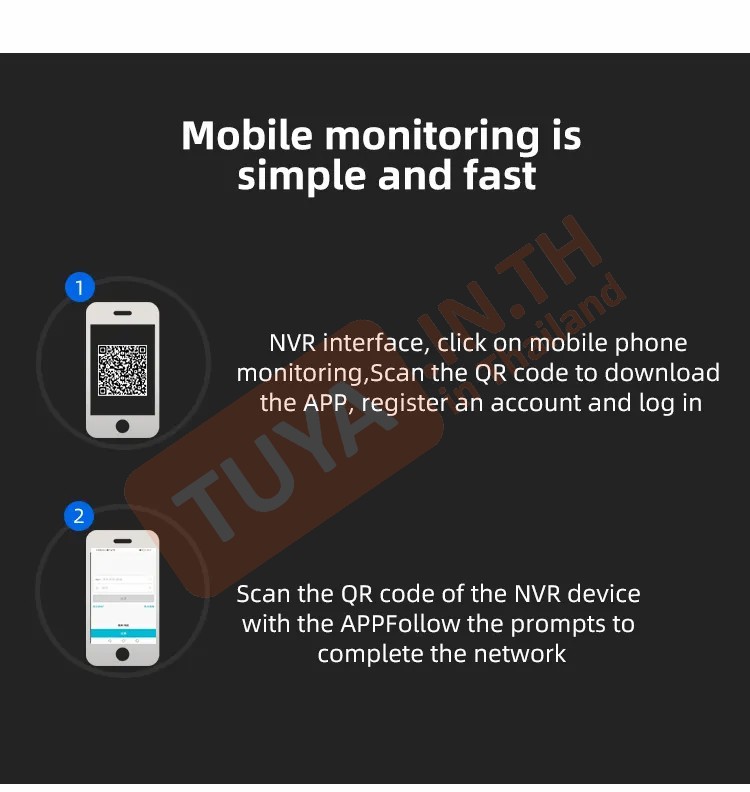
วิธีเชื่อมต่อกล้องเข้ากับ Applications Smart Life
- การตั้งค่าที่กล่อง NVR
1. เสียบปลั๊กไฟ และอแดปเตอร์เข้าสู่กล่อง NVR
2. เชื่อมต่อสายส่งภาพ VGA หรือ HDMI เข้าสู่หน้าจอเพื่อแสดงภาพ
3. ใช้เมาส์คลิกปุ่ม HOME รูปบ้านสีฟ้า ที่อยู่มุมซ้ายล่างสุดของหน้าจอ
4. เลื่อนเมาส์มาคลิกที่หัวข้อ Cloud
5. เมื่อคลิกปุ่ม Cloud จะแสดง QR Code 3 แบบขึ้นมา คือ ios,Android,SN
6. ให้เลือกสแกน QR Code ชื่อว่า SN ที่อยู่ขวาสุดของหน้าจอ และกด OK
- การเชื่อมต่อจากกล่อง NVR เข้ากับ App Smart Life
1. เข้า App Smart Life
2. กดปุ่มปุ่มวงกลมสีฟ้ามีเครื่องหมาย + จะอยู่มุมบนขวาสุดของหน้าจอ และไปที่ Add Device
3.เลือกตัวเลือกที่ 3 คำว่า Scan
4.นำโทรศัพท์ไปสแกน QR Code ตัวเลือก "SN"บนหน้าจอคอมพิวเตอร์ และกด connect
5.เมื่อเชื่อมต่อสำเร็จแล้ว ให้กดปุ่ม Done กรอบสีฟ้าข้างล่างสุดของหน้าจอโทรศัพท์
- การเชื่อมต่อ กล้องวงจรปิด เข้ากับหน้าจอแสดงภาพ
1. นำสาย LAN มาเสียบเข้ากับช่องที่ติดมากับสายของตัวกล้อง
2.กล้องจะมีแสงไฟสีเหลือง 4 ดวง และแสดงภาพที่หน้าจอคอมพิวเตอร์
รองรับการเชื่อมต่อกับ
| ฟังก์ชั่นในหน้าหลัก (MAIN PAGE FUNCTION) | |
|---|---|
| Sound | On / Off |
| Screenshort | |
| Recording | |
| Recording video | |
| Zoom in / Zoom out | |
| Cloud storage | |
| Direction | |
| ฟังก์ชั่นการตั้งค่าในส่วน SETTINGS | ||
|---|---|---|
| Third Party Supported | Amazon echo | |
| Google home | ||
| Basic Function Settings | Time Watermark | On / Off |
| Talk mode | One-Way Communicaion | |
| Two-Way Talk | ||
| Detection Alarm Settings | Motion Detection Alarm | On / Off |
| Alarm Timer Settings | Schedule | Add |
IF THEN ของกล่องควบคุม
| IF | THEN | ||||
|---|---|---|---|---|---|
| Format Status | -20000 - 20000 | ✕ | Format Status | -20000 - 20000 | ✕ |
| Current Storage Device | 0-65535 | ✕ | Current Storage Device | 0-65535 | ✕ |
| Siren | Siren on / off | ✓ | Siren | Siren on / off | ✓ |
| Restart Device | On / Off | ✕ | Restart Device | On / Off | ✕ |
| Supported Storage | 0-65535 | ??? | Supported Storage | 0-65535 | ??? |
| Storage Device Status | 1-5 | ✕ | Storage Device Status | 1-5 | ✕ |
| Format Storage Device | On / Off | ✕ | Format Storage Device | On / Off | ✕ |
IF THEN ของตัวกล้อง
| IF | THEN | ||||
|---|---|---|---|---|---|
| Motion Alert | On / Off | ✓ | Motion Alert | On / Off | ✓ |
| Stop Zoom | On / Off | ✕ | Stop Zoom | On / Off | ✕ |
| Zoom control | Zoom out / Zoom in | ✕ | Zoom control | Zoom out / Zoom in | ✕ |
| Motion detection | 1 | ✕ | |||
| Humanoid detection | 1 | ✕ | |||
Sound : ไม่มีเสียงแจ้งเตือนเชื่อมต่ออุปกรณ์
วิธีเชื่อมต่อกล้องเข้ากับ Applications Smart Life
- การตั้งค่าที่กล่อง NVR
1. เสียบปลั๊กไฟ และอแดปเตอร์เข้าสู่กล่อง NVR
2. เชื่อมต่อสายส่งภาพ VGA หรือ HDMI เข้าสู่หน้าจอเพื่อแสดงภาพ
3. ใช้เมาส์คลิกปุ่ม HOME รูปบ้านสีฟ้า ที่อยู่มุมซ้ายล่างสุดของหน้าจอ
4. เลื่อนเมาส์มาคลิกที่หัวข้อ Cloud
5. เมื่อคลิกปุ่ม Cloud จะแสดง QR Code 3 แบบขึ้นมา คือ ios,Android,SN
6. ให้เลือกสแกน QR Code ชื่อว่า SN ที่อยู่ขวาสุดของหน้าจอ และกด OK
- การเชื่อมต่อจากกล่อง NVR เข้ากับ App Smart Life
1. เข้า App Smart Life
2. กดปุ่มปุ่มวงกลมสีฟ้ามีเครื่องหมาย + จะอยู่มุมบนขวาสุดของหน้าจอ และไปที่ Add Device
3.เลือกตัวเลือกที่ 3 คำว่า Scan
4.นำโทรศัพท์ไปสแกน QR Code ตัวเลือก "SN"บนหน้าจอคอมพิวเตอร์ และกด connect
5.เมื่อเชื่อมต่อสำเร็จแล้ว ให้กดปุ่ม Done กรอบสีฟ้าข้างล่างสุดของหน้าจอโทรศัพท์
- การเชื่อมต่อ กล้องวงจรปิด เข้ากับหน้าจอแสดงภาพ
1. นำสาย LAN มาเสียบเข้ากับช่องที่ติดมากับสายของตัวกล้อง
2.กล้องจะมีแสงไฟสีเหลือง 4 ดวง และแสดงภาพที่หน้าจอคอมพิวเตอร์